
learn to how to add furigana in Microsoft Word!
Over the last few days, I've noticed some very interesting things about integrating the windows IME, Japanese windows support, and the word processor Microsoft Word.
Until then, I didn't know it was possible to add furigana to texts I write in kanji in Microsoft's word processor.
Steps to add furigana in Microsoft Word
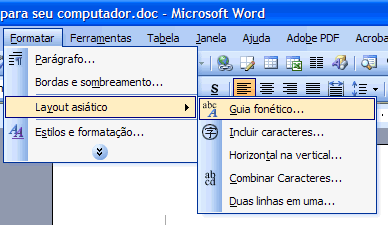
The first thing we need to do is type in text that we want to “furiganize” and then select the typed text. After that go to menu format, select the option Asian layout and click on the option phonetic guide.
Right after that, a dialog box similar to the image below will appear. In it you will find varied options on how to add and format furigana in Microsoft Word texts.
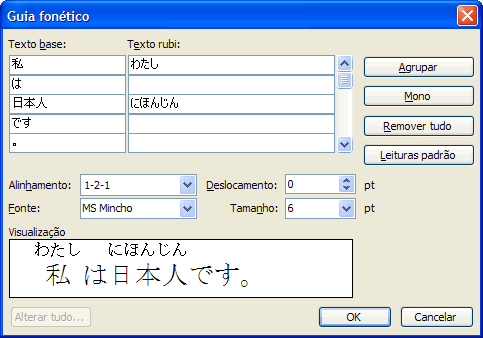
Below is the description of each item in the window above:

- Base text: is the text you typed and selected before clicking the menu phonetic guide. In our case, this is the Japanese text. Note that Microsoft Word already separates parts of sentences automatically. If it doesn't separate the sentence correctly, you can click on the text boxes and change their content.
- Ruby text: is the furigana, the text in hiragana which is on top of the kanjis. Microsoft Word always tries to fill in furigana automatically, the problem is that it doesn't always get the correct pronunciation. So, always try to check that the furigana inserted is correct and correct any imperfections.
- Alignment: Controls how furigana is distributed in Word texts. If you play around with this option a bit, you'll discover interesting alignments for furigana.
- Source: Determines the font used to format the furigana. For people who like to install Japanese fonts on their computer, this can be a great option to improve the appearance of their texts.
- Size: Modifies the font size used in furigana. You can increase and decrease the Japanese font size according to your taste.
- Displacement: Sets the distance between furigana and kanji text.
- visualization: Shows how you will spin your Japanese text.
The Phonetic Guide dialog box buttons have the following functions:
- Agroup: Groups all kanji, allowing you to enter a single text into hiragana like furigana from kanji.
- Mono: Separates the phrase by symbols, allowing you to add a furigana for each kanji in the phrase.
- remove all: Removes all furigana from texts in Microsoft Word.
Once you have added furigana to Microsoft Word and you are satisfied with the result, just click on the Ok button for the changes to take effect. Through this same path, you can add furigana in sentences and paragraphs of your Japanese texts.
Note that when we select a paragraph, Microsoft Word adds a scroll bar beside the ruby text fields.
With that, we can scroll the bar and navigate through all the words of the text that was selected.
In addition to the Phonetic Guide, the Asian Layout menu also lets you add really interesting options to the text we type in Microsoft Word. How about exploring these features and learning a little more?